Using the timeline
Below each graph window is a timeline. Toggle its visibility in Application Menu → View → Timeline.
The graph's toolbar controls a few aspects of it:
- Playback settings — soundtrack, BPM, audio input.
- Timeline format — raster between bars, seconds, or frames.
- Loop playback — show the loop (work-area) handles.
- Dope / Curve — switch between the two primary editing modes.
Controlling playback time
Scrub time by dragging in the lower shaded section of the timeline. (The upper area is for selecting keyframes and time clips — see Selecting timeline elements.)
Playback shortcuts:
Space— toggle playback.Home— jump to start.L— play forward; press again to speed up.J— play backward; press again to speed up.K— stop../,— jump to next / previous keyframe.Shift + ←/Shift + →— step 30 ms.
Hold Shift while scrubbing to snap to the bar raster and other timeline elements.
Snapping and the time raster
In the background the time raster shows the current grid. Switch between:
- Bars — uses the project's BPM.
- Seconds.
- F30 and F60 frames.
Dragging timeline elements snaps to the bar raster by default. Zoom in for finer subdivisions (beats, ticks); zoom out for coarser ones (measures, phrases). Hold Shift to disable snapping. Raster density is configurable in Settings.
Selecting timeline elements
Keyframes and time clips can be selected in a few ways. The selection drives both the selection range indicator (above the timeline) and the keyset indicators (the strip just below the ruler).
Keyset indicators (the strip below the ruler)
Every visible keyframe — or cluster of nearby keyframes — is represented by a small dot in the strip directly below the ruler:
- Unselected — hollow dot.
- Partially selected — filled dot with a notch (some keys in that cluster are selected).
- Fully selected — filled dot.
Interactions:
- Click a dot — select the keys that dot represents, replacing the current selection.
- Drag a dot — move those keys through time without touching the broader selection.
- Click on the background (no dot under the cursor) — clear the keyframe selection.
- Drag on the background — fence-select. While you drag, the dots under the fence preview as selected. Hold
Shiftto add to the current selection,Ctrlto remove from it.
Clusters automatically merge when keys are within ~2 px on screen, so zooming in exposes individual dots and zooming out combines them.
The selection range indicator
Inside the ruler there's a thin horizontal bar — the selection range indicator (SRI) — that spans the current selection:
- When keyframes are selected, the bar covers their time range (plus any selected clips).
- When nothing is selected, the bar dims to 30 % opacity and spans the extent of all visible keyframes, letting you grab everything at once without pre-selecting.
The bar has three hit regions, each lighting up independently when hovered:
- Start handle (left edge) — stretch from the right.
- End handle (right edge) — stretch from the left.
- Middle line — translate the whole selection.
Stretching. Drag either edge handle to scale the selected keyframes and clip endpoints proportionally around the opposite fixed boundary.
Translating. Drag the middle to shift everything. The translation snaps when the selection's start or end aligns with a snap target (raster, current time, clip boundary, etc.) — whichever gets a closer match wins. Hold Shift to bypass snapping.
If nothing is selected, an SRI drag auto-selects every visible keyframe first, so you can simply grab the bar and stretch all keys of the visible parameters together.
TimeWarp handles
For retiming a section of the selection non-uniformly, the SRI supports TimeWarp handles — small filled circles placed on the bar.
Alt + Clickon the bar inserts a handle at the cursor.Alt + Clickon an existing handle removes it.- Drag a handle (with or without
Alt) to retime keys and clip endpoints in the two adjacent segments. The previous handle (or the SRI start) and the next handle (or the SRI end) stay pinned; everything between them is remapped piecewise-linearly around the moving handle. - With handles present, dragging the SRI start or end retimes only the outermost segment instead of stretching the whole selection.
- Middle-translating the SRI shifts the handles along with the keys, so they stay visually attached.
Handles are cleared automatically when you replace the keyframe selection (clicking a different keyset indicator, fence-replacing, or deselecting everything). Adding to or removing from the existing selection leaves them in place. Handles outside the current selection range are hidden.
Handle drags are undoable — Ctrl + Z restores both the keyframes and the handle positions. Inserting and removing handles themselves is not part of the undo history.
While Alt is held, hovering the bar previews an outlined circle at the cursor — solid outline means "insert here", centered on an existing handle means "remove this one".
Scrub, no-drag, and the legacy range
Directly under the ruler you may also see the older time-selection range (a translucent band with handles at the bottom of the canvas) while holding Alt over the dope sheet. It has the same stretching behavior as the SRI and is kept for muscle-memory compatibility — the SRI is the recommended workflow.
Working with the Dope Sheet
The dope sheet displays the keyframes of the currently selected operators.
Adding and editing keyframes
To animate a parameter, click its input in the Parameter Window while holding Alt to insert the first keyframe:

Once animated, you can:
- Insert new keyframes by modifying the parameter value.
- Toggle keyframes via the keyframe indicator in the parameter window.
- Adjust interpolation via the context menu.
- Adjust a keyframe's value by selecting it and editing in the parameter window.
- Insert keyframes on a curve by
Alt-clicking the animation curve directly.
To remove an animation either delete all its keyframes or reset the parameter by clicking its name in the parameter window.
Displaying keyframes
By default, only the keyframes of selected operators appear in the timeline. Enable Keep animated parameters visible in the toolbar to keep parameters pinned even when you select other operators:
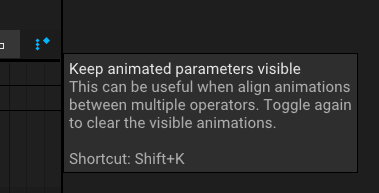
If too many parameters stack up, press Ctrl + Shift + K twice to clear the list.
Interpolation and tangents
The keyframe context menu switches between interpolation modes. For fine control of tangents, flip the mode toggle from Dope Sheet to Curve and edit the curve directly.
Editing curves next to the dope sheet
You can also open a curve editor for a single parameter without leaving the dope sheet. Click the curve-edit icon next to the parameter's pin icon on its dope-sheet row. A curve area appears below the dope sheet showing that parameter's curve; the dope sheet above shrinks to only the space it needs. Click the icon again — or the close chevron in the top-right of the curve area — to hide it.
A few things to know about this view:
- Vector parameters (Vector2/3/4, colors) show per-component letters (
X Y Z,R G B A) on the parameter's row once the curve area is open. Clicking a letter the first time isolates that component (hides the others); subsequent clicks add and remove components. Clicking the last visible component restores the default "all visible". - Hover feedback is linked between the two views: hovering a curve line, a keyframe, or a dope-sheet row dims everything else and highlights the matching element in the other view.
- Keyframe dragging in the curve area latches to U or V after a small threshold based on which axis you move more — so a mostly-vertical drag cleanly becomes value-only. Hold
Ctrlto move freely on both axes. - Tangent edits are undoable with
Ctrl+Zlike any other keyframe change. - Selecting multiple parameters for curve editing at once works — toggle the curve-edit icon on each. The curve area draws them all together.
The fullscreen Curve mode still exists for cases where you want the entire timeline body dedicated to curves.
Inserting animation increments
Press Shift + C to insert a keyframe whose value is incremented by 1 relative to the previous one. This is useful for tapping step markers while a soundtrack plays:
- Add a soundtrack to your project.
- Press
Hometo jump to the start. - Create a
[Value]operator and animate it. Set its interpolation to Constant. - Press
Spaceto play. - Press
Shift + Con every beat you want to mark. Keyframes with values1, 2, 3, …appear at those times. - Feed the animated value into
[HasValueChanged]+[TriggerAnim](or similar) to drive events.
To recompute the keyframe values after inserting or deleting keys:
Shift + Clickthe keyframe row to select all keyframes.- Run Recount values from the context menu.
Working with time clips
Some operators — notably [TimeClip] and [VideoClip] — output time clips. They're evaluated only while the current playback time falls within their clip time; outside that window they're skipped, as if disabled.
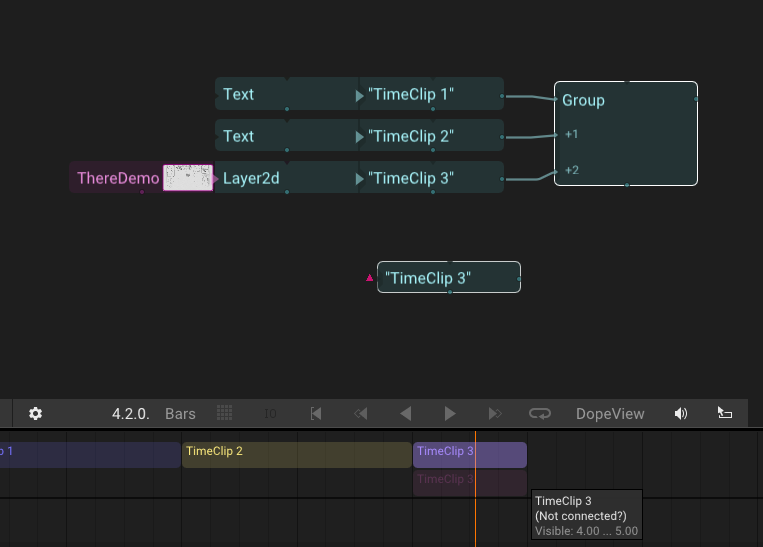
If a composition contains any time clips, the timeline shows a Time Clip Area above the dope sheet. Combine clips with a [Group] to build a scene timeline:
The active clip is highlighted during playback.
Time clips need to be connected
[!NOTE] Clips not connected to a consumer never render unless they're pinned to the output window. TiXL fades unconnected clips and shows a "Not Connected?" warning on their tooltip:
Editing time clips
Drag one or more clips with the left mouse button. They snap to:
- The timeline raster (in Bars mode).
- Other time clips.
- The current playback time.
- Other keyframes.
- The loop range (when active).
Hold Shift to disable snapping. Rename a clip by pressing Return.
Time clip layers
Drag clips vertically to distribute them across layers. Layers do not affect rendering order — connection order in the group does. TiXL distributes overlapping clips into separate layers automatically; Ctrl + Shift while dragging vertically adjusts only the layer index.
Time remapping
Time remapping lets a clip scale or offset the source time it exposes to its sub-graph — similar to [SetCommandTime], but local to the clip.
In the example above, the second clip plays its contents at 500 % speed. The red bar at the bottom of the clip indicates the remap.
Selecting a single clip shows two curves visualizing the mapping from clip time to source time:

Ways to edit the remap:
- Drag a clip's start or end while holding
Alt. - Slip-drag the source region by dragging inside the clip with
Alt + Ctrl. - Select clips and choose Edit Clip Times from the context menu.
- Clear Time Stretch from the same menu resets the mapping.
[!NOTE] Remapped time interacts with keyframe editing in sometimes-surprising ways. Consider whether the remap is actually necessary before committing to it.
Splitting clips
Select one or more clips and run Cut at Time from the context menu. Each clip splits at the current playback time; the new clip is renamed and reconnected to the same target group.
Nesting timing
If an operator symbol has an output flagged as time clip, instances of that operator also appear in the time clip area. Unlike [TimeClip], nested time-clip operators do not link their source time to the clip time — moving such an operator from t=0 to t=1 bar leaves its source time at 0.
Editing videos
The clip workflow doubles as a lightweight video editor for [VideoClip]s. Seeking inside heavily-compressed sources is slow; if you plan to scrub a video, re-encode it first with an all-intra preset:
Clip Timing Editor
Open the Clip Timing Editor to set precise times for one or more selected clips:

When a selection contains multiple values, the editor shows NaN for the mismatched field — type a number to set it across all selected clips at once.
Audio and data clips
In addition to op-backed time clips, the timeline also hosts two clip types that aren't tied to a graph operator:
- Audio clips are placed by dropping a
.wav/.mp3/.oggonto the clip area. They render as waveform bodies and play back through the audio engine. - Data clips are produced by recording a live session (see Recording) or by dropping a
.datafile. They render with per-event tick marks across the body — sparse recordings show every event, dense ones show a soft fill.
Both types share the timeline with op-backed clips: same drag, trim, snap, and selection behavior across all three. Selecting a clip of one type clears selection on the other types unless you hold Shift or Ctrl.
Editing audio clips
Click an audio clip to select it. The Parameter window then shows an inspector with:
- Volume — 0.0 to 4.0, default 1.0.
- Source Offset (s) — skip the first N seconds of the source file.
- Source Duration (s) — how much of the source plays under the clip's TimeRange.
0means "until the end of the source". - Layer — which row the clip lives on.
- Main soundtrack — when set, the clip drives the timeline waveform background, FFT routing for
[AudioReaction]-driven effects, and the video export pipeline. Only one clip per project should have this set.
Trimming via the start/end handles on the timeline adjusts Source Offset and Source Duration together — the clip stays anchored in time while the audible window shrinks. The clip's body width follows the audible duration; it can never extend beyond the source content (no synthetic silence at the end).
Selecting multiple audio clips shows a simplified inspector with shared fields only — Volume and Layer can be bulk-edited, the rest are per-clip.
Drag a clip body horizontally to shift its TimeRange, vertically (across a full row height) to change Layer. Hold Shift while clicking to add to selection across both audio and data clip types.